The Cold Chain
If you take one thing from this entire section, take this: 30°F is the number. It is written at the top of my own sausage notes, before the plate chart, before anything about spices or casings, because it is the rule that decides whether everything downstream works. Not “keep it cool.” Not “chill the meat first.” Thirty degrees Fahrenheit, right at the edge of freezing, meat that crunches slightly when you squeeze a cube — that is the working temperature of sausage making, and holding it is a chain, not a step.
I call it a chain because that is exactly how it fails. You can chill the meat perfectly, and then hand it to a room-temperature grinder head and lose everything in eight seconds. You can grind cold and then let the mixing bowl sit on the counter while you go find the marjoram. Every link has to hold, from the moment the meat comes out of the refrigerator to the moment the last link goes on the smoker rack, and the batch is only as cold as the warmest thing it touched.
This page is about that chain: what actually goes wrong when it breaks, where it breaks in a home kitchen, and the specific things I do to keep it intact.
What actually happens when it gets warm
Almost everybody who has made sausage has been told to keep it cold. Far fewer have been told why, which is a shame, because the why is what lets you diagnose a bad batch instead of just being disappointed by one.
Fat smears instead of cutting. This is the big one. Pork back fat at 30°F is firm and brittle — a grinder plate slices it into discrete particles that stay discrete. The same fat at 50°F is soft and plastic, and the auger doesn’t cut it, it pushes it. It gets pressed and stretched into a film that coats the lean meat particles and coats the inside of the grinder. What comes out looks like paste rather than a mosaic of white and red.
That coating is the whole problem, and it is worth understanding as a physical thing rather than an aesthetic one. Once a film of fat has wrapped a lean particle, the salt can no longer reach the muscle protein properly, so the bind never fully develops. And when the sausage hits the heat, that smeared fat has no cell structure holding it — it renders straight out. You get a puddle in the pan, a shrunken greasy link, and a dry crumbly interior, all from one mistake made twenty minutes earlier at the grinder.
It is temperature-first, not a fat-quality problem. I want to be emphatic about this because it is the single most common misdiagnosis in home sausage making, including mine for years. When a batch smears, the instinct is to blame the fat — wrong cut, too soft, bad pig. Occasionally that is true; leaf fat genuinely is too soft for a particle sausage. But nine times out of ten the fat was fine and the temperature was not. Firm back fat at 55°F will smear. Mediocre fat at 30°F usually won’t. Fix the temperature before you go shopping for better fat.
The emulsion breaks. For emulsified sausages — franks, bologna, weisswurst, anything with that smooth homogeneous texture — the temperature ceiling is harder and lower and the failure is more dramatic. Push a pork emulsion past about 59°F (15°C) and the fat globules coalesce and separate out. There is no recovery. The batch is a broken mess and you cannot re-emulsify it by mixing harder; mixing harder is what broke it.
Bacteria. The least interesting reason, honestly, but real. Ground meat has enormous surface area — you have taken the exterior of a muscle and distributed it throughout the entire mass. Anything on the surface is now everywhere. The 40–140°F danger zone is not a suggestion, and a warm mixing bowl sitting out for an hour while you fuss with casings is exactly the kind of thing that lets a batch go off before it ever reaches the smoker. Cold is a food-safety hurdle as well as a texture one.
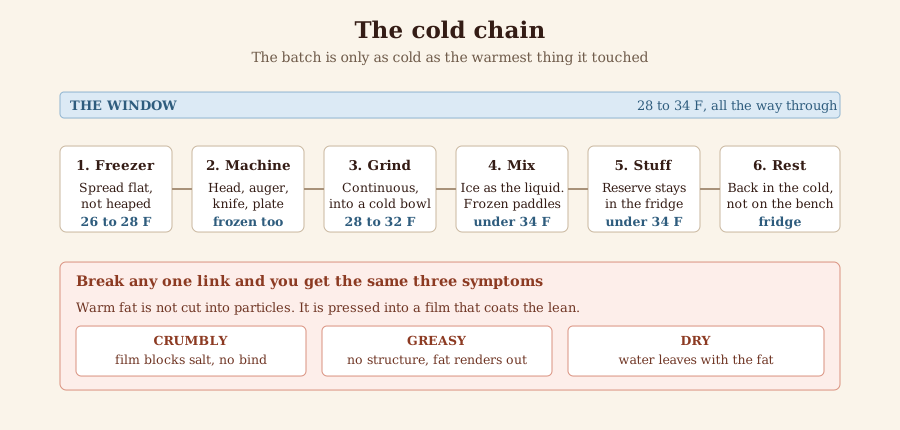
The chain, and the single failure it produces. Crumbly, greasy and dry feel like three separate faults. They are one event at the grinder.
The chain, link by link
Here is the chain as I actually run it. It is not complicated; it is just a lot of small disciplines that have to all happen.
1. Start colder than your target
Meat and fat go into the freezer before anything else, cut into grinder-sized pieces, spread on a sheet pan in a single layer rather than heaped in a bowl. Heaped meat insulates itself and the center stays warm. Spread out, it chills evenly.
How long? Until the outside is firm and the center still gives — usually 45 minutes to 2 hours depending on your freezer and the size of the cubes. You want partly frozen, not frozen solid. Rock-hard meat is hard on the grinder motor and can shatter rather than cut.
I aim to have the meat come out of the freezer at around 26–28°F, because it will warm on the way through the process and I want the warming to happen inside my window rather than above it.
2. Freeze the machine, not just the meat
This is the link most home sausage makers skip, and it is the one that quietly ruins batches. A grinder head is a big lump of metal. At room temperature it is a 70°F heat exchanger that your 30°F meat has to travel through. The auger, the plate, the knife, the head, the neck of the tube — all of it goes in the freezer for at least half an hour before I grind. So does the stuffer cylinder and its piston.
You can feel the difference. Cold steel keeps the first pound of meat from being the batch’s warmest pound.
3. Grind fast, in the cold
Have everything ready before the meat comes out — seasonings weighed, bowls chilled, casings soaked and rinsed. The grinding itself should be a continuous run, not a stop-and-start. Every pause is time on the counter.
If the batch is big enough that grinding will take a while, I grind in stages and put each stage back in the freezer while I do the next. Two 10-pound passes with a chill between them beats one 20-pound pass that ends warm.
4. Mix cold, and use ice as an ingredient
Water and ice is its own page, but the short version belongs here: when a formula calls for liquid, use it as crushed ice or ice water. It is hydration and temperature control in the same addition. Ice is doing real thermodynamic work — the heat of fusion means melting ice pulls a great deal of heat out of the block, far more than merely cold water would.
Mixing generates heat. Hands generate a lot of heat. Which brings me to the piece of equipment that changed this step for me.
5. The mixer that solved my worst link
For most of forty years I mixed by hand, in a big bowl, and I would tell you to keep the block cold while doing it — advice I gave knowing that my own hands were the warmest thing in the kitchen. Two minutes of hard hand-mixing to develop the bind puts real heat into the meat, and I could watch the block go from crisp to slack.
I bought a Vevor BMM-10 hand-crank sausage mixer, and the honest verdict is that it fixed the problem in two separate ways. First, I freeze the parts — the drum and the paddles go in the freezer alongside the grinder head, so the mixing vessel itself is pulling heat out instead of adding it. Second, my hands never touch the meat. The paddles fold the block over on itself far more thoroughly than I ever did by hand, and they do it without a 98°F heat source in the middle of the bowl.
The result is a better bind at a lower temperature, which is a rare thing to get both of at once. If you are still mixing by hand, freeze a stainless bowl, work fast, and stop the moment the bind arrives — but if you make sausage regularly, this is the upgrade I would point at. Details of the bench are on my bench.
6. Stuff cold, and don’t let the queue sit
Stuffing is where I see the most avoidable warming, because it is the slowest step and it feels like the meat is just waiting. It isn’t waiting; it’s warming. Keep the reserve in the refrigerator or over ice and load the stuffer in portions. A frozen stuffer cylinder buys you a lot here.
7. Rest cold
Once linked, everything goes back into the cold — overnight in the refrigerator for a fresh sausage to let the seasoning distribute and the bind set, or straight into the cure and ferment schedule for a cured one. Do not leave finished links on the counter admiring them. I have.
How to actually know the temperature
Guessing is how the chain breaks, because meat that feels cold to a hand that has been handling cold meat feels cold at 45°F too. Your hand is not a thermometer and it recalibrates.
I use an instant-read probe and I check at three points: coming out of the freezer, coming off the grinder, and going into the stuffer. It takes five seconds each time. Three numbers per batch is not fussiness, it is the difference between knowing and hoping.
The thermometers and scales page covers the gear. The relevant point here is that this is a process temperature, distinct from the doneness temperature you will take later with a Meater or a leave-in probe. Both matter; they are different measurements at different stages, and a lot of confusion comes from conflating them.
Working targets, by product
Not every sausage wants the same number. Here is what I actually work to:
| Product | Grind at | Mix at | Stuff at | The failure if you’re warm |
|---|---|---|---|---|
| Fresh, coarse (brat, Italian, breakfast) | 28–32°F | ≤34°F | ≤34°F | Smear; fat renders out in the pan |
| Coarse cured (summer sausage, salami) | 28–32°F | ≤34°F | ≤34°F | Smear; no particle definition on the cut face |
| Dry-cured, pressed (Landjäger) | 28–32°F | ≤32°F | ≤32°F | Smear; and the smeared fat blocks the dry |
| Emulsified (frank, bologna, weisswurst) | 26–30°F | ≤55°F, never past 59°F | ≤55°F | The emulsion breaks. No recovery. |
The emulsion row is the one with a hard ceiling rather than a preference, and it is why emulsions get their own page.
The one place I break my own rule
Fresh sausage that is going straight into a pan, same day, eaten by people I am cooking for tonight — I will run that a little warmer than 30°F if I’m honest, because a small textural loss on a breakfast patty doesn’t matter much and I’d rather have breakfast. That is a considered exception on a product with no storage and no cure, not permission to relax.
Everything cured, everything dried, everything smoked, everything emulsified, everything I am going to eat weeks from now: 30°F, the whole chain, no exceptions. Those are the sausages where the mistake compounds instead of just costing you a little texture.
What a broken chain looks like afterward
Because you will break it, and it helps to recognize the evidence rather than blame the recipe:
- A greasy, shiny sheen on the raw mix, and fat visible on the grinder plate as a film rather than as particles — you smeared. Chill the block hard and re-grind if it’s early enough; accept a lesser sausage if it isn’t.
- A cooked link that shrank a lot and left a puddle — the fat rendered out because it had no structure. Same cause.
- A crumbly cut face with no cohesion — the bind never developed, often because smeared fat blocked the salt from the protein.
- A gray, unappetizing raw color and a slightly sour smell — you spent too long in the danger zone. Do not smoke that batch hoping to fix it.
The full symptom-to-cause table lives on troubleshooting, but almost every entry on it traces back here.
Part of Making Sausage, and one piece of the whole craft at Sausage. Next: trimming and cubing — what you do to the meat before any of it reaches the grinder.
Comments (0)