Presses
I own two: a Dutch-style press and a “standard” cheese press. This page is what pressing actually does, how the two differ, and the number nearly every home recipe gets wrong — which I got wrong for years without knowing it.
⭐ And it now ends somewhere I didn’t expect, because after thirty years the first press has warped drastically — which turns out to be a better argument about what to buy than any of the mechanism comparison that precedes it.
What pressing is for
Not, primarily, to squeeze out whey. The curd page covers the tools that really control moisture: the cut, the cook, the stir. By the time curd reaches a press, most of the whey it’s going to lose has already gone.
Pressing does two other things:
It knits the curd into a single body. Individual curd grains fuse into a continuous paste. An under-pressed wheel has voids between the grains, and voids are where things you didn’t invite grow — inside the cheese, where you can’t see them until you cut.
And it closes the surface, forming a skin that a rind can develop on and that resists invasion.
So the goal is a closed, knitted body, not a dry one. Over-pressing is a real failure: force whey out too fast and you seal the outside before the interior has drained, trapping moisture in the middle — the same mistake as cooking too fast, by a different route.
🔴 The number: pressure, not weight
Here is the thing.
“Press at 20 pounds” is not an instruction. It’s half of one.
What matters to the curd is pressure — force spread over the area it’s applied to. The same weight on a small mould and a large mould are completely different treatments.
The arithmetic is simple:
PSI = pounds ÷ area, and for a round follower, area = π × radius²
Work an example, because the numbers are genuinely startling:
A 6-inch diameter follower has a radius of 3 inches, so its area is 3 × 3 × 3.14 = 28.26 square inches.
- To press that at 10 PSI, you need 28.26 × 10 = 283 pounds on the follower.
- Put 100 pounds on it and you’re pressing at 100 ÷ 28.26 = 3.54 PSI.
Two hundred and eighty-three pounds. For a modest 6-inch wheel, at a pressure that plenty of hard-cheese recipes ask for. That is the number that reframed pressing for me — because it explains, instantly, why lever presses and screw presses exist at all. You are not going to stack 283 pounds of anything on a kitchen counter safely.
Converting a recipe to your own mould
Most decent recipes give you pounds and the mould diameter they assume — which means they’re specifying a PSI without saying so. If your mould is a different size, you have to recalculate or you are pressing at the wrong pressure:
Pounds₂ = Area₂ × (Pounds₁ ÷ Area₁)
So a recipe calling for 50 lb on a 4-inch mould (area 12.56) is asking for about 4 PSI. On your 6-inch mould that’s 28.26 × 4 ≈ 113 lb, not 50.
And if the recipe gives pounds with no diameter, it has told you almost nothing. That’s worth knowing rather than assuming you’re following it correctly. I followed such recipes for a long time.
The two presses
⭐ These are the two I actually own, and the pictures below are catalogue photographs of those models — not of my bench. My own presses, side by side, are still the figure this page most wants.
I bought the Dutch-style lever press first, then upgraded to the “standard” screw press — and having used both for years, the honest verdict is at the end of this section and it is not the one the word “upgrade” implies.
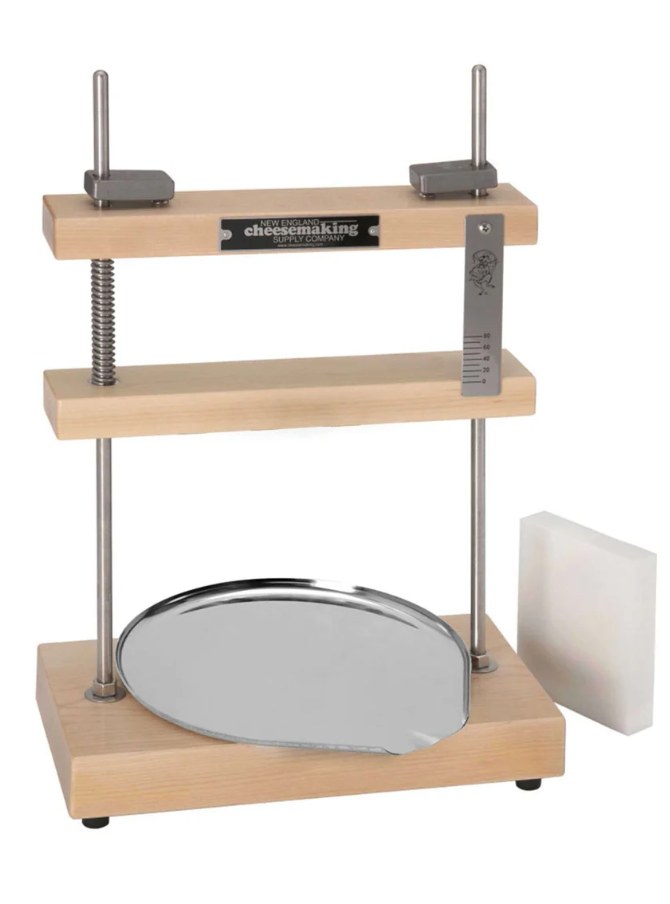
The “standard” press — a screw
A frame, a screw, and a follower. You turn the screw to apply force.
What’s good: compact, cheap, and it holds its setting.
What’s awkward: you don’t actually know how much force you’re applying. A screw press converts turning into pressure with no readout, so “half a turn more” is not a measurement. Some have a spring and a scale, which helps a great deal; most don’t.
And it doesn’t self-compensate. As the curd consolidates and the follower descends, a screw press’s force drops — the curd sinks away from the screw. So you have to come back and tighten it, repeatedly, through the press.
⭐ The spring is the whole point, and it took me a while to see why
Mine has one — the coil around the central screw in the photograph, with the calibrated scale plate beside it. It’s easy to read that as a nice extra. It isn’t. The spring is what makes the scale mean anything, and it also fixes most of the problem in the paragraph above.
Think about what a bare screw is: a displacement device. You turn it, it moves a fixed distance, and whatever force results is whatever the cheese happens to push back with. A bare screw is effectively rigid — so the instant the curd yields even slightly, the force collapses. Not decays. Collapses. That’s why a plain screw press needs nursing every twenty minutes.
Now put a spring in series. The screw still sets a displacement, but the spring converts it into a force: roughly force = spring stiffness × compression. If the cheese then shrinks by some small amount, the spring simply extends by that amount and the force falls by stiffness × that amount — a small, gradual loss instead of a collapse.
Two things follow, and both are practical:
The scale becomes a real readout. You’re not reading turns; you’re reading spring compression, which is the force. That converts “press at 20 pounds” from a wish into an instruction — which matters, because this page’s whole argument is that the number is real and most home setups can’t see it.
And the force decays slowly enough to be manageable. A spring-loaded screw press still needs re-tightening, but on the timescale of a press stage rather than continuously. It sits between the bare screw and the self-compensating lever, and the softer the spring, the closer to the lever it behaves.
That’s the actual reason to prefer a sprung screw press over a plain one, and no catalogue I’ve read says it.
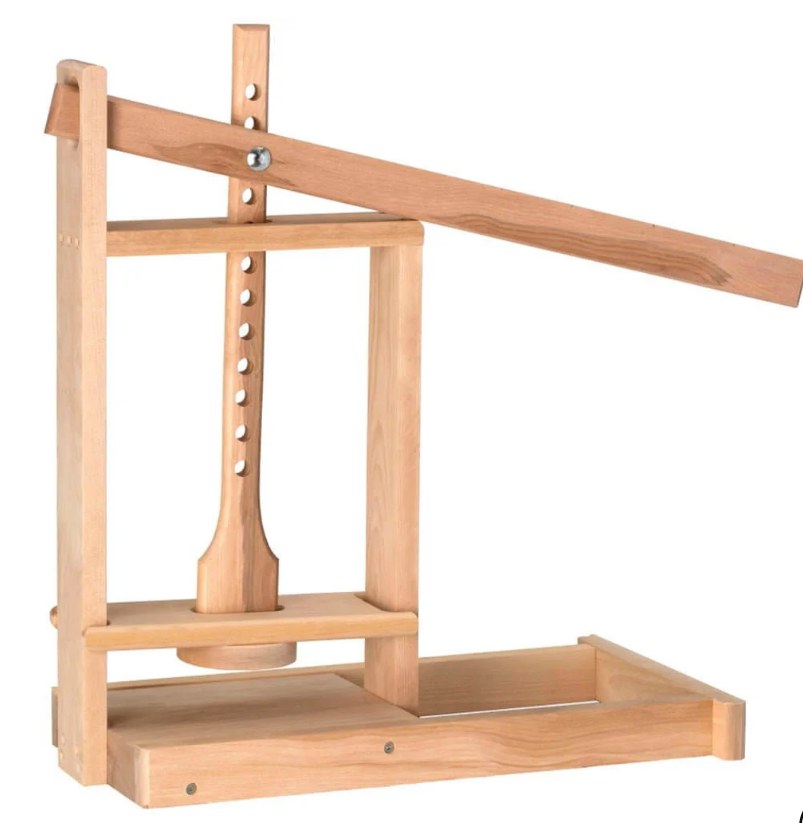
The Dutch-style press — a lever
A long arm pivoting over the follower, with weight hung on the far end. Mechanical advantage multiplies a small weight into a large force.
What’s good: you get real force from a manageable weight, and — the part I appreciate more the longer I use it — it self-compensates. As the curd consolidates and the follower drops, the arm simply follows it down and keeps applying the same force. No coming back to re-tighten.
The arithmetic is a lever calculation, and there’s a term people forget:
Force on the curd = (mechanical advantage × hung weight) + the weight of the arm and plunger themselves
That second term is not negligible. A heavy wooden arm and a plunger can be contributing meaningful force before you hang anything at all — which is why a Dutch press with no weight on it is still pressing, and why the first, gentlest stage of a press schedule can sometimes be “just the arm.”
What’s awkward: it’s bulky, and the geometry has to be right for the mould height.
⭐ And that’s what the column of holes is for
Look at the vertical post in the photograph — the one the arm is bolted through. It’s drilled with about a dozen holes running down it.
Those are the answer to the geometry problem. Different moulds are different heights, and the cheese gets shorter as you press it. Move the bolt up or down a hole and the arm comes back to roughly level.
⚠ One thing worth being precise about, because it’s easy to overclaim: for a straight arm with a weight hanging vertically off the end, the force ratio is L ÷ d — the distance from pivot to weight over the distance from pivot to plunger — and that ratio is geometrically insensitive to modest tilt, because the same tilt shortens both moment arms proportionally. So keeping the arm level is not primarily about keeping the arithmetic honest.
What it’s actually about is the mechanism. A badly tilted arm pushes the plunger at an angle instead of straight down: it binds in its guide, it puts side-load on the frame, and friction starts eating an unknown share of the force you calculated. The holes keep the thing pressing straight, which is a more mundane reason and a more useful one.
🔴 Mine has warped drastically — and that is the real argument against an all-wood press
Here is the part I would not have written before checking, and it changes my recommendation.
My lever press has warped badly. Thirty years of use, and it shows.
It was always going to. Consider the environment a cheese press lives in: it is repeatedly soaked with warm whey and then dried, over and over, for decades. That is close to a laboratory protocol for warping timber. Wood moves with moisture, it moves unevenly along and across the grain, and a long thin arm is the worst possible shape for resisting it. This is not a defect in the press. It is what wood does.
What a warped press actually costs you, and it maps exactly onto the section above:
The plunger stops descending straight. The column of holes can correct the arm’s angle; it cannot correct a bowed arm or a frame that has gone out of square. So the plunger binds in its guide, and friction takes an unknown share of the force.
Which means the one thing a lever press was good for is compromised. I said above that a lever gives you constant force with no number. A warped lever gives you neither constant nor known — the friction varies with how far the plunger has travelled. That is worse than either honest option.
And the pressure goes uneven across the follower. A follower pushed at a slight angle presses one side of the wheel harder than the other, which knits the curd unevenly — one side denser, the other more likely to hold the voids that pressing exists to close.
⚠ There’s a hygiene dimension too, and it’s a real one. Warping opens joints and raises grain, and sanitation and safety makes the point that wood is porous and cannot be sterilised — which is fine for sound wood in a cave, where it is part of the ecosystem, but cracked wood on a food-contact surface is a different proposition. Sound wood you clean and dry; split wood you inspect honestly and eventually retire.
⭐ Which is what the “upgrade” actually was — and it isn’t what I thought
I described the second press as a screw press replacing a lever press, and framed the choice as a mechanism question. Looking at the two of them, that’s the wrong axis.
Look at what changed between them:
| Lever press | Screw press | |
|---|---|---|
| Mechanism | Lever — better (constant force) | Screw + spring |
| Alignment-critical parts | Wood — the arm, the post, the frame | ⭐ Two stainless steel guide rods |
| After thirty wet-then-dry cycles | Warped | Rods are still straight |
🔴 The real upgrade was moving the parts that must stay straight out of wood and into metal. The screw press still has wooden bars — but the bars only need to be stiff, not aligned; the stainless rods are what hold the geometry, and stainless does not care how many times you soak it in warm whey.
That reframes the whole buying question, and I had it wrong a paragraph ago:
The lever is the better mechanism. Wood is the worse material. Most home lever presses are all wood. So the mechanism you want and the material you want don’t usually come in the same object at a home-kitchen price.
⭐ Which I’d choose — revised, because my own press argued with me
I bought the lever press first and “upgraded” to the screw press. Having used both for years, I’d put it differently now:
They are not a worse press and a better press. They’re a press that gives you a constant force with no number, and a press that gives you a number that slowly decays.
| Force over time | Do you know the number? | |
|---|---|---|
| Lever + weight | Constant — gravity doesn’t care how far the follower has dropped | No — you calculate it |
| Sprung screw | Decays slowly as the cheese shrinks | Yes — read the scale |
| Bare screw | Collapses the moment the curd yields | No |
And now add the third column, which is the one my own bench supplied:
| Force over time | Know the number? | After 30 years of whey | |
|---|---|---|---|
| Lever + weight (all wood) | Constant | No | 🔴 Warped — so neither constant nor known |
| Sprung screw (steel rods) | Decays slowly | Yes | Rods still straight |
I had written: “if I were buying one press, still the Dutch-style lever.” I’m revising that, because my own lever press has warped and the second one hasn’t.
The honest recommendation now:
Buy the mechanism you want in the material that survives. The lever is the better mechanism and I still think so — self-compensation is genuinely worth more than a readout for long schedules. But an all-wood lever press in a home kitchen is on a clock, and if the choice in front of you is all-wood lever versus sprung screw with steel guides, I would now take the screw press. It is the one that will still be square in twenty years.
If you can find a lever press with metal guide rods and a metal-pinned pivot, that is the actual best answer and it is what I’d look for if I were starting again.
And having both is genuinely the right pair — lever for long schedules while it still runs true, sprung screw for anything you intend to make twice, because a readable force is a repeatable force, and repeatability is what a make sheet exists to buy. That’s not a recommendation to buy two presses; it’s what I ended up with by accident, and thirty years later the accident looks like foresight.
⚠ What I’d do about a warped press rather than replace it: check whether the plunger still drops freely through its guide with no cheese in it — that’s the test that matters, and it takes ten seconds. Store it dry and unloaded, not clamped down and not damp. And be realistic: warping is largely not reversible, so this is about knowing what the press is still good for rather than about fixing it.
If I were buying none: see below, because you may not need one yet.
Press schedules, and why they ramp
Recipes give you a sequence — light, then heavier, then heavier still, with the wheel flipped between stages. Both parts matter.
The ramp exists because early curd is fragile. Hit fresh curd hard and you close the surface before the interior has drained, and you tear grains rather than knitting them. Start gentle, let whey leave freely, then increase.
The flips exist because pressing isn’t symmetrical. Whey drains downward, the bottom face sits in it, and the top face gets the follower. Flipping evens out both the moisture and the shape. Do it more at the start, when things are still moving.
You may not need a press at all
Worth saying plainly, given I own two.
A great many excellent cheeses are never pressed: everything in fresh, all of the brined family including feta, the bloomy rinds, and blue — which specifically wants an open curd and would be ruined by pressing.
And for the ones that do want pressure, gravity plus improvisation goes a surprisingly long way. A weighted follower in a mould in a draining tray will make a perfectly good young gouda. You need a real press for hard, low-moisture, long-aged cheese — cheddar, alpine, grating — and not much before that.
Which puts the press about fourth on the list in equipment, well after a thermometer and arguably after a pH meter. I bought mine much earlier than that, and it didn’t make my early cheeses better.
Next: the make, step by step — the universal sequence everything else refers back to.
Sources
- PSI = pounds ÷ area with area = πr²; the worked 6-inch follower example (28.26 sq in; 283 lb for 10 PSI; 100 lb giving 3.54 PSI); the mould-conversion formula Pounds₂ = Area₂ × (Pounds₁ ÷ Area₁); and that recipes specifying pounds plus a diameter are implying a PSI: Rick Robinson’s home cheesemaking forum on PSI and cheeseforum.org, “Pressing Question: Weight vs PSI”
- The Dutch lever relationship, including the weight of the arm and plunger as a term in its own right: ThinkCheese, “Dutch Style Press Calculations”
Comments (0)