Artisan Breads
Artisan bread is where I fell hardest for baking. It’s the crackly-crusted, open-crumbed, deeply flavored stuff — the boule, the batard, the ciabatta — made from almost nothing (flour, water, salt, and a leavening) but transformed by time and technique rather than added richness. There are no shortcuts here, and that’s exactly the appeal. Here’s how I get bakery crust and crumb at home, including the two things beginners most want to know: how to score with the razor, and how to get that huge “oven spring.”
What makes bread “artisan”
Mostly two things: lean dough and long fermentation. Lean means no sugar, fat, or milk to soften it — just the four fundamentals, so the flavor and texture come entirely from the grain and the ferment. Long fermentation (often a slow, cool rise, and frequently sourdough) is where the real flavor develops — the same reason a slow-smoked brisket beats a fast one. Add high hydration (a wet dough, 75%+ — see the scale on the Ingredients page) and you get the big, irregular, glossy holes that define a great crumb.
Handling wet dough — folds, not kneading
A high-hydration artisan dough is too wet and sticky to knead the old way, and you don’t need to. Instead you build strength with stretch-and-folds: every 30–45 minutes during the first few hours (the bulk ferment), you reach under one side of the dough, stretch it up, and fold it over itself, turning the bowl and repeating. Four sets of that develops a beautiful, strong, extensible gluten web with almost no effort — and a wetter dough than your hands could ever knead. The famous no-knead method is just this idea taken to its lazy extreme: mix, wait a long time, and let fermentation do the gluten-building for you.
Shaping and the skin
When you shape an artisan loaf, you’re building surface tension — dragging the dough across the counter to create a taut, smooth “skin” on the outside. That tight skin is what lets the loaf hold a tall shape and spring up in the oven instead of spreading into a pancake. Then it proofs (often overnight in the fridge — the cold makes it easier to handle and builds flavor) in a floured banneton basket that supports the round while it rises.
Scoring with the lame — making an ear
Right before it goes in the oven, you score the loaf: a quick, decisive slash with a razor blade. Most bakers use a lame (pronounced “lahm”) — literally a razor blade on a handle. This isn’t decoration; it’s control. As the loaf hits the heat it expands fast, and the score gives it a planned place to burst, instead of tearing open randomly at a weak spot.
The trick to a beautiful raised “ear” — that crispy lifted flap on a great loaf — is the angle:
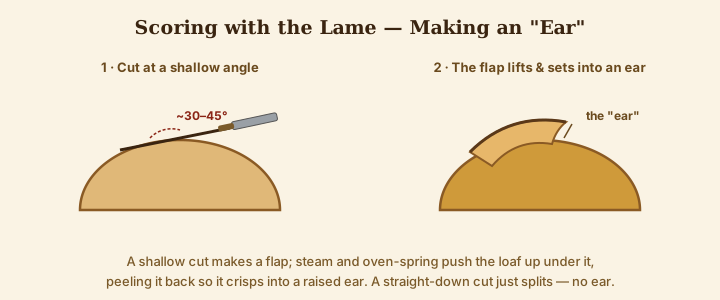
- Hold the blade at a shallow angle, around 30–45° to the surface — not straight down.
- Make one confident, fast cut about ¼–½ inch deep. Hesitation drags and tears.
- That shallow angle cuts a flap; as the loaf springs up in the oven, the flap peels back and crisps into a raised ear.
- A straight-down cut just splits open — useful and fine, but no ear.
A cold, firm dough (straight from the fridge) scores far more cleanly than a warm, soft one — one more reason I love the overnight cold proof.
Oven spring, steam, and the Dutch oven
The dramatic rise in the first minutes of baking is oven spring — trapped gases expand, the yeast gives one last burst before the heat kills it, and the loaf leaps up. Two things maximize it:
- A screaming-hot oven — usually 450–500°F, preheated with a baking stone or steel so heat slams into the loaf from below.
- Steam in the first 10–15 minutes. Steam keeps the crust soft and stretchy just long enough for the loaf to fully expand before the crust sets — and it’s what gives you that thin, crackly, glossy, deeply browned crust. Without steam the crust hardens too early and chokes off the rise.
The easiest way to get both at home is a Dutch oven: a heavy lidded pot, preheated screaming hot. You drop the loaf in, put the lid on, and the dough’s own escaping moisture becomes a perfect little steam chamber. Lid on for the first ~20 minutes (steam + spring), lid off for the rest (browning). It’s the single best trick for bakery-quality artisan loaves in a home oven — more on all of this on the Ovens & Equipment page.
Reading the crumb and crust
Part of the craft is learning to read your results:
- Big, irregular, glossy holes = well-fermented, well-handled high-hydration dough.
- Tight, even, dense crumb = under-fermented, or gluten torn during shaping, or too little water.
- A thin, crackly, blistered crust = enough steam and a hot enough oven.
- A pale, thick, soft crust = not enough heat, or not enough time.
Where to point the craft
The artisan approach shines anywhere you want crust and chew. My sourdough loaves are the heart of it, but the same lean-dough, high-heat, steam-and-score method makes the best pizza dough (a lean dough baked as hot as your oven will go — see Ovens) and crusty pretzels. Once you’ve got folds, shaping, scoring, and steam down, you can make almost any crusty bread in the world.
For the softer, richer side of baking, head to everyday Loaves.
Comments (0)