Building the Sugar Shack
Right now I boil in the yard. Buckets on spiles, sugar and red maples, a turkey fryer, and a March wind that decides how my day goes. It works — I’ve got syrup on a store shelf and a table at a farmers market to prove it — but I’m standing outside feeding propane to a burner that throws most of its heat at the sky, and I know exactly what the next step is.
The next step is a building.
This page is the plan. I have not built it. No slab, no site picked, no arch bought. What I have is a stack of research, a real budget, and a reframe that reorganized everything else I thought I knew about sugarhouses. So take this as the thinking I’m doing before I spend the money, not a tour of my sugarhouse. If you’re at the same place — a few dozen taps, a fryer, and an itch — maybe it saves you a mistake you can’t un-pour.
One thing up front, because it changes the floor plan and not just the paperwork: there’s a legal decision that comes before the slab, and in Michigan it turns on where you sell rather than whether you sell. That’s a page of its own — Permitting & Licensing — and I’ll point back at it exactly where it touches the design. This page is the building.
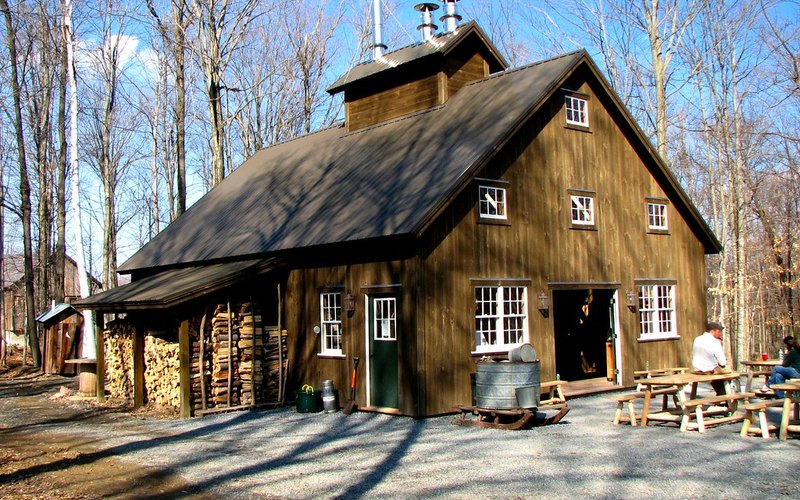
What a sugarhouse actually is
Here’s the reframe that made everything else click. A sugarhouse is not a shed you happen to boil in. It’s a machine for getting steam out of a box. That’s the whole design brief. Everything else — roof, walls, floor, door — serves that one job, and if you get it wrong, nothing else you did right will save you.
To make one gallon of syrup you evaporate roughly forty gallons of water. Not “some water.” Forty gallons, as steam, into a room. If it doesn’t leave, it finds the coldest surface available — the underside of your roof, in Michigan, in March — and condenses, and comes back down.
The North American Maple Syrup Producers Manual, the closest thing this craft has to a canonical text, says it about as plainly as an extension publication ever says anything:
“Water vapor that is allowed to condense inside the sugarhouse will cause water to drip over equipment and supplies in the sugarhouse. This ‘raining’ effect should be avoided as it can cause contamination of syrup, containers, and equipment, as well as create an unpleasant and unsafe workspace.”
Read that twice. It rains dirty water into your open pans. That’s not a comfort complaint, it’s a food-safety failure, and I sell this stuff. A guy with a turkey fryer in the yard has no steam problem at all — the sky is an infinitely large cupola. The moment I put a roof over the operation I’ve created the hardest engineering problem in the build, and I’ve created it on purpose.
So: cupola first, everything else second.
The cupola — and three rules that flatly disagree
The cupola is the vented box running along the ridge, doors on both sides, opened while you boil. It’s what makes a sugarhouse look like a sugarhouse from the road. It’s also where the research gets messy, and I’d rather show you the mess than pretend it’s tidy.
There are three rules of thumb in circulation for how big a cupola should be, and they do not reconcile.
- NAMSP’s rule: the roof opening should be as long as the evaporator and at least 75% as wide. The cupola doors should be at least 75% as long as the evaporator, minimum 24 inches high.
- The 1:1 folk rule: match the evaporator footprint exactly — a 2×4 vent for a 2×4 evaporator. Vent area at least equal to pan area.
- The “go bigger” rule: practitioners reporting condensation trouble at 1:1 and advising something like 1.5× pan area.
NAMSP’s is the least generous of the three — which is worth sitting with, because NAMSP is the most authoritative source on this page and it’s the one telling you to build the smallest hole. Part of the gap is that people are measuring different things: NAMSP sizes the roof opening, the forum rules usually mean open door area. But that doesn’t explain all of it, and I won’t average three disagreeing numbers into a fourth that nobody said.
What I take from it is a design driver rather than a dimension, and this one is NAMSP’s: the doors should be large enough that on a windy day, one door alone can handle all the steam from the boil. Because on a windy day you will close the windward door — otherwise the wind blows straight down into the plume. Whatever number you land on, each side by itself has to vent the entire boil. That sentence quietly doubles your cupola.
A reconciling note from the forums: a 2×6 door on each side gives you double the pan’s surface area in vent, which is how a 75%-of-length opening still ends up adequate. And as a sanity check, the Jamaica Cottage Shop’s 12×16 kit ships with a rough opening for a 4×8 cupola — about 2.7× pan area on a building sized for a 2×6. A company that sells these for a living is biasing high.
The failure mode is expensive and the marginal cost of a bigger cupola is a few sheets of lumber, so I’m going to bias oversize and say so. But I’m not telling you NAMSP’s number is wrong, because I don’t know that, and neither does anyone quoting me.
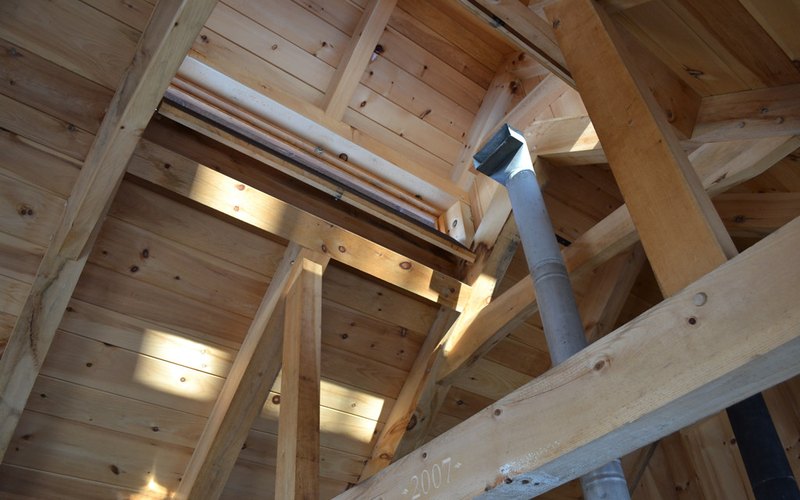
A few construction details I’ve filed away, all from practitioners rather than extension, so weigh them accordingly:
- Frame the cupola like a doghouse with no floor, with the bottom plate angled to match your roof pitch. Build it on the ground, hoist it up, lag-bolt it down into the rafters.
- Bottom-hinged doors swinging outward shed rain and snow while you boil. The clever version hinges on a length of 3/4” steel pipe fastened about a third of the way down from the top of the door, running into pillow blocks lagged to the cupola frame. Pull a line at the inside top edge to swing the door open and cleat it off — infinite adjustment. Because the doors are bottom-heavy, easing the line closes them by gravity.
- Work them from the floor with ropes and pulleys. You are not climbing to the ridge at 2 a.m. in March.
- Make them lockable for the off-season. A cupola is a large, permanently open invitation to everything that flies.
The alternative to a big cupola is a steam hood and stack on the evaporator itself, catching the plume at the pan and ducting it through the roof. NAMSP is even-handed: “The cost of the steam hood and stack is not insignificant, but should be weighed against the potential problems caused by condensation.” Some producers run a hood and keep a smaller traditional cupola. And one line NAMSP drops almost in passing that I think is underrated: put a layer of wood or hard foam insulation under metal roofing. Bare metal is a condensing surface, and you’ve hung it directly over your pans.
Makeup air — the thing that actually breaks cupolas
This is the part I’d have gotten wrong.
Everyone obsesses over cupola size. The sources say the cupola usually isn’t the failure — the sealed building is. Steam will not leave a closed box unless an equal volume of air comes in to replace it. A wood-fired arch and a steam plume are both exhausting the building, and a tight, well-sealed modern structure gives them nothing to breathe.
And this isn’t just a wet-ceiling problem. NAMSP puts it in the safety chapter:
“The construction of new, tighter sugarhouses has increased the possibility of high carbon monoxide levels in the work area. Provision for a supplemental air source for combustion should be considered if very tight structures are built.”
A tight modern sugarhouse is more dangerous than a drafty old one. That’s counterintuitive, and it’s why makeup air is a life-safety item rather than a ventilation detail. CO detectors and smoke detectors go in before the first boil, not after.
The practitioner consensus on placement is unanimous, specific, and not what instinct tells you. Bring the air in high, at the eaves, and distribute it. Do not crack a door at ground level and aim cold air at the arch — the classic wrong answer. Cold air blasting into the plume swirls around it, chills it, and the plume collapses and hovers instead of rising. As one producer put it: air from the eaves beats air from a window at ground level; without open eaves it won’t draft up and draw the moisture out.
How much air? I don’t know, and neither does anyone I can cite. There is no maple-specific CFM or free-area figure in any extension source I found. NAMSP says only that supplemental combustion air “should be considered.” The gas-appliance code numbers — one square inch of free area per 1,000 Btu/h and so on — are written for listed, rated appliances with a nameplate Btu input. A wood-fired arch has no nameplate. Its firing rate swings wildly between charges, and forced draft changes the picture completely. Those rules are a sanity floor at best, and every practitioner says the code minimum feels far too small in a sugarhouse. I’m not inventing a number to make this section feel more finished than it is.
The stack
NAMSP’s rule for wood-fired evaporators: the stack should be two to two and a half times as high as the arch is long. A 6-foot arch wants 12–15 feet; a 4-foot arch, 8–10. Stack diameter? NAMSP explicitly refuses to give one and tells you to ask the manufacturer. So I’m not guessing either.
There’s a second, independent height rule. The maple rule is about draft. The building-code rule is about fire safety and wind eddies — NFPA 211’s 3-2-10 rule: at least 3 feet above where the chimney exits the roof, and at least 2 feet higher than anything within 10 feet horizontally. Both apply, and the more stringent governs. On a 12×16 shack with 9–10 foot walls they tend to land in the same 12–16 foot neighborhood — but check both.
Then the heat, which NAMSP does not soften:
“Wood-fired arches generate a tremendous amount of heat. Working stack temperatures commonly exceed 500°F. Care must be taken to avoid exposing combustible material, including the walls of the sugarhouse, to these extreme temperatures. Be sure to provide plenty of open air space between the back of the stack and any combustible materials.”
Class A insulated pipe wants a minimum 2 inches of clearance to combustibles. A roof jack seals the roof penetration. Guy wires keep the wind from taking it. Note that these are fire department questions no matter what the building is called legally — an agricultural exemption doesn’t make a 500°F pipe next to a wood wall acceptable.
And a spark arrester, with a design tension built in: fine enough mesh to catch embers, open enough not to choke the draft — NAMSP says flatly that “a spark arrester must not restrict the draft of the stack.” Sturdy enough for wind, with a metal rain cover.
Note the interaction. Forced draft increases the amount of burning material sent up the stack — so the efficiency upgrade everyone recommends makes the arrester more necessary and makes restricting the stack more consequential. You don’t get to ignore either half.
The floor gets soaked — plan the drains before the pour
Every March day in that building is boiling sugar water in open pans, hosing equipment, tracked-in snow, and condensing steam. The floor gets wet and stays wet. NAMSP:
“Sugarhouse floors should be made of concrete. Some state health departments or other regulatory agencies require a concrete floor for sanitary reasons.”
Dirt, unpainted wood, or anything porous is impossible to keep clean and is a straight risk to the product. Grade the whole floor toward drains at a minimum pitch of 1/8 inch per foot. And this is the line I’ve highlighted: “There should be adequate drainage receptacles put in place prior to pouring the floor.” You plan drains before the pour or you live with what you poured.
The common answer is a 4-inch circle drain, but NAMSP notes the obvious problem — it’s hard to slope an entire floor to a single point. The better answer is a grate or trench drain: a channel running the length of the evaporator, or a trench around its perimeter. Easier cleanup around the arch, and — crucially — a much larger target to grade fresh concrete toward.
Finish with a fine broom finish: enough traction, still easy to clean. Or smooth plus floor paint with anti-slip additive. NAMSP is blunt — “a concrete floor that is too smooth is a serious risk for slipping and injury.” Picture carrying a full draw-off pan across a wet, glassy slab. Right.
Two more I’d have missed:
- Where the water goes. “Water leaving the sugarhouse should not flow directly into a watercourse or otherwise contribute to erosion of the site.”
- The hot-water trap. Some evaporator accessories dump a lot of very hot water. Run that through drains under the building and you can melt ice in the soil under the slab and make frost heaving worse. A beautifully nasty little failure: your efficiency upgrade slow-motion cracks your floor.
The firing pit
This is my favorite detail in the whole manual, and it’s free if you plan it and impossible if you don’t:
“Incorporating a recessed pit in the floor in front of the firebox is a convenient element in a wood-fired operation. Standing 8 to 12 inches below the floor will ease back strain when firing the evaporator and make cleaning the ashes from the firebox less tedious.”
You’ll open that door and throw wood into it a few hundred times a season. Standing a foot lower puts the firebox at a sane height for your back and turns ash cleanout from a stoop into a reach. NAMSP says it “requires some additional engineering but has proven to be worth the extra effort.” And the pit needs its own drain — otherwise you’ve built a bathtub in front of your fire.
⚠ Slab or gravel? The sources split
NAMSP says concrete, and notes health departments may require it. Jamaica Cottage Shop says treated sill plate over either a gravel pad or a slab, on the grounds that evaporator equipment and firewood are heavy and spilled sap wrecks a wood floor. They agree on no wood floor. They disagree on gravel.
My read: gravel is probably structurally fine and it’s what plenty of hobby shacks sit on. But it forecloses the sanitary-floor requirement, and I sell syrup — and you cannot retrofit a slab under an installed arch. I’m pouring concrete. If your build is permanently private and you’ll never sell a jar, gravel is a live option.
Under the slab: at least 8 inches of well-compacted gravel, steel reinforcement, 4 inches minimum (more if a vehicle drives in). Never pour on frozen ground. Moist-cure seven days — NAMSP says that’s about 50 percent stronger than the same concrete left in dry air. Footings below the frost line, which “may be 4 to 5 feet in northern locations.” Michigan counts.
Size, layout, and workflow
NAMSP’s clearances are the skeleton, and they’re all HIGH-confidence:
- Minimum 4 feet of working space around the evaporator.
- At least 4 feet for workbench space.
- A wood-fired evaporator needs at least 6 to 10 feet in front for firing.
- Finished wall height of 9 to 10 feet — modern evaporators run 4 to 8 feet tall with a hood or preheater, and this keeps trusses and collar ties from fighting your arch.
- Adding a few feet of sidewall height costs only 5 to 10 percent extra. Cheap insurance.
Do that arithmetic for a 2×6 arch and you land at roughly 12×16 to 16×20 feet — exactly the range the kit companies sell for this duty. That’s my arithmetic from their clearances, not a quoted figure, but it lands where the market lands.
For 50–200 taps the vendors point at a 2×4 to 2×6 wood-fired arch (CDL rates an 18”×48” at 50–125 taps, an 18”×60” at 100–200). I’d size the building for a 2×6 even if I start smaller, because NAMSP is unusually emphatic here:
“Beginning sugarmakers may be tempted to undersize the sugarhouse. When this occurs it is not uncommon for the sugarmaker to be faced with the need to expand after only a few years.”
And elsewhere, gloriously: producers “always build the sugarhouse twice as large as they think they will ever need — that way they will only have to add on to it once.” Followed by: “Most producers have observed that the sugarhouse is never large enough.”
The layout rule is short and good. The syrup draw-off point is the focal point, and it should be central. Arrange everything else — RO, filter, pumps, tanks — so you can check their status at a glance from the draw-off, because that’s where you’ll be standing. The flow: sap storage outside on the cool north side → elevated feed tank → evaporator → filtering → canning in a separate room → finished syrup in a separate, lockable, cool, dark space.
That separate canning room isn’t fussiness. NAMSP: canning in the same room as the evaporator “presents a potential risk to the product,” and a separate processing room is “an ideal way to control the quality of syrup entering retail containers.” For someone whose syrup goes on a store shelf, that’s the room I’d fight for when the budget gets tight.
🔴 And here’s where the law lands on the floor plan
Look back at that flow — sap, feed tank, evaporator, filter, canning, storage — and notice what isn’t in it: a customer.
That’s not a design preference. In Michigan the whole building-permit exemption for an agricultural building turns on five words — not used in the business of retail trade — and I sell. A store carries my syrup; I stand behind a table at a farmers market. So the question isn’t whether I sell, it’s where the selling happens, and that answer draws itself as a floor plan: boil and pack here, sell somewhere else, and the shack is plausibly still exempt. Put a sales counter in this building and it very likely isn’t.
That decision comes before the slab, because it may change what the slab is. It’s also why I’m pouring concrete rather than laying gravel. The full analysis — the statutes, the parts nobody has settled, and why the Right to Farm Act is not the answer you’ll be told it is — is on the Permitting & Licensing page. Read it before you finalize a footprint, not after.
Two more that cost nothing now and a fortune later: doors big enough to move equipment through (plan this before the arch shows up), and no chemical or gasoline/oil storage in the evaporator room — ever.
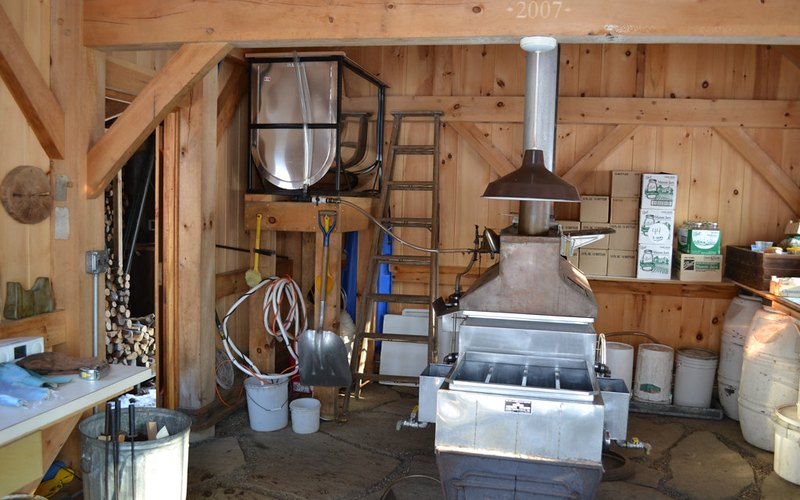
Wood, sap, and the load nobody plans for
Wood. The old rule is 1 cord of dry hardwood per 75–100 taps (UNH says 80–100 — close enough that I trust the shape of it). A cord runs about 20–25 gallons of finished syrup on a standard evaporator with no efficiency devices. For 50–200 taps that’s roughly half a cord to 2.7 cords a season.
But here’s the catch: split firewood needs to air-dry nine months to a year (unsplit, at least a year). Which means two seasons’ wood on site at once — this year’s dry stack and next year’s seasoning. So I’d build for about 3 cords. NAMSP’s yardstick: an area 8 by 16 feet stacked 5 feet high holds 5 cords, so ~3 cords is roughly an 8×10 lean-to at 5 feet.
Put it on the end nearest the arch. NAMSP: this “allows the stacking of wood near the evaporator instead of moving it from a second location” — and the line that should govern all of it, “try to reduce the number of times firewood must be handled.” Protect it from rain and drifting snow, but do not seal it in a tight structure; it needs air to dry.
Sap storage. Minimums per tap: 1 gallon for buckets, 1½ for gravity tubing, 2 for vacuum. I’m on buckets, so 50–200 taps → 50–200 gallons. NAMSP calls these minimums and means it — they don’t account for a broken RO, a dead preheater, or a rest day you didn’t schedule. Tanks on the north side (least sun; heat spoils sap), covered against contamination but ventilated so they don’t warm, off the roadside and away from exhaust and dust. And keep them well lit and easy to reach, because — this is such an honest observation — “tanks located in a well-lighted area that allows for easy access are more likely to be kept clean.”
And now the one that will get you. The feed tank has to sit above the evaporator inlet — 18 inches or more if you run a preheater — because head pressure is what makes the thing work. NAMSP: “The more head pressure from the feed tank, the better the evaporator will function. Often this requires putting the feed tank in a loft.”
Then, in a sentence you could skim right past: “a full sap tank is heavy, with sap weighing 8⅓ pounds per gallon.”
Do the multiplication. A 200-gallon feed tank in a loft is about 1,670 pounds, plus the tank, concentrated on a small footprint, over your head, over your open pans. That’s a structural design input, not a detail — the most under-appreciated load in a hobby sugarhouse, and it has to be designed for rather than discovered. It also argues hard for that 9–10 foot wall: you need loft clearance above an evaporator that’s already 4 to 8 feet tall.
Materials, and what I’d build
NAMSP ranks construction methods cheapest to dearest: post-frame / pole barn (“the least expensive” — the poles serve as foundation, bracing, and framework at once), then light frame (more lumber, more complexity, more money), then post-and-beam / timber frame (“the most expensive,” because it takes a specialized contractor to cut and fit the timbers). Post-frame is where I’m headed. It’s cheapest, it’s honest, and nobody photographs my sugarhouse.
Roof: any fireproof material that carries the snow load. Asphalt shingles are specifically not ideal — they hold snow and are less durable than metal. Corrugated metal with sealing-washer fasteners is the sensible answer; standing seam is beautiful and runs 25–30% more. And again: insulation under the metal, or the roof becomes your condenser.
Siding is there “to keep wind and weather out of the sugarhouse and not necessarily to insulate” — rough-sawn board-and-batten or shiplap from a local mill is cheap, traditional, and right. NAMSP pushes native materials generally; local lumber “will usually be less expensive than purchasing construction lumber from conventional building supply outlets.” Interior walls should wipe or hose down and be tight enough to discourage rodents: plastic milk-house paneling where sanitation is critical (the canning room), painted shiplap, plywood, or painted metal elsewhere. Windows: “simple barn sash windows are suitable.” Don’t overthink it — plenty of them buys you free light out of a lengthening March day.
⚠ Pressure-treated lumber — the non-obvious one. NAMSP: “The use of pressure-treated, decay resistant lumber should be minimized… some of the chemicals used in the treatment process may be potential sources of contamination to the finished products. This is especially true where condensate from the evaporation process may find its way back into the evaporator.” The endorsed exception is treated lumber for the foundation sill, which prolongs the building’s life.
Sit with that logic, because it generalizes: in a sugarhouse, everything overhead drips into your food. Steam rises, condenses on whatever’s above the pans, falls back in. That one fact governs material choice for the entire ceiling plane, and it’s the kind of thing you’d otherwise learn the hard way.
Costs, honestly. The only current, real number I have is the Jamaica Cottage Shop 12×16 pre-cut shell kit at $11,189.99 (192 sq ft, 4/12 gable, rough opening for a 4×8 cupola). There’s a 2017 DIY costing floating around for a 20×30 — ~6,689 board feet, roughly $6,700 in Eastern White Pine at 2017 prices — but that’s a bigger building at prices predating the 2020–2023 lumber whiplash, and I won’t present it as current. I found no current itemized DIY costing. The defensible statement: a 12×16 shell runs around $11k as a purchased kit, and a determined DIY build with local rough-sawn lumber comes in well under that — by an amount I can’t honestly quantify yet.
The rig, and where the money actually goes
The building is only half the money. Here’s what I learned pricing the boil, and the punchline isn’t what I expected.
First, the trap. Smoky Lake’s Corsair advertises “FROM $3,528.75.” That’s the flat-pan bundle. The same Corsair with a raised flue pan set is $7,568.75. Read the headline, budget for a serious flue rig, and you’re short by about $3,600.
The arithmetic is genuinely upside-down:
| FROM price | |
|---|---|
| Corsair arch alone | $1,870.00 |
| Corsair + flat pan (the headline) | $3,528.75 |
| Corsair + raised flue pan set | $7,568.75 |
| Flue pan sets, sold separately | $4,100–$5,550 |
The pan set costs more than the arch — twice as much at the top end. The arch is the cheap part, and “FROM $X” always hides which pan it assumes. That’s the most useful thing to know before you open a vendor page.
Second, the gap. 50–200 taps straddles a real hole in the market. The entry rigs — Leader Half Pint 15–50 taps, VEC Sapling 5–50, Smoky Lake Dauntless 10–55, all $1,370–$2,150 — all die at about 50 taps, which is the bottom of my range. The next real rung is the Dauntless Hybrid at $3,700.70 (30–95 taps); after that it’s a CDL 2’×6’ Complete at $8,682 (50–250 taps) or a flue-pan Corsair at $7,568.75. Not much lives between $2,150 and $3,700, and there’s a canyon between $3,700 and $8,682. The ladder has a rung missing, and it’s the rung I need.
Also: trust GPH, not tap ratings. One maker rates a 7–9 GPH rig at 1–50 taps; another rates a 4 GPH rig at 15–50. Same ceiling, double the boil. The numbers aren’t measuring the same thing.
And a caution on evaporation rates generally: published gal/hr figures disagree by up to 90% on the same pan size. UNH’s table says a 2×4 does 15 gal/hr; Bascom’s says 8–10. They agree exactly at 24”×33” (5 gal/hr), then diverge. Neither states firing method, pan type, or forced draft — probably the whole explanation, since a flue pan with forced draft is a different machine from a flat pan on natural draft. Don’t plan your boil hours off one of those numbers. For sizing the building it doesn’t matter; both point at a 2×4 to 2×6. For planning your March, it matters a lot.
On flues: more flue area means more pan surface touching firebox heat, which raises the evaporation rate. That direction is well-supported by the vendors’ own GPH ladders and by the pricing. You’ll see a specific claim quoted around — a drop-flue pan doing 2× a flat pan, 25 vs 11 gal/hr — attributed to Smoky Lake. I went looking on the page it’s attributed to, and those numbers aren’t there; it makes only the qualitative surface-area argument. The direction holds; the multiplier is unsourced, and I won’t repeat it as fact just because it’s tidy.
⚠ One vendor note: W.F. Mason turns up in a lot of “affordable stainless arch” recommendations and the numbers look attractive for this range. But their website failed DNS resolution on both hostnames when I went to check. Every Mason figure in circulation is a snippet against a site that didn’t answer. The company’s status is unclear, and I’m not recommending them until someone confirms they’re still trading.
🔴 The actual lede: buy the RO before the bigger arch
Here’s the sharpest thing in all of it, and it took me a while to see.
Smoky Lake — a company that sells arches — says plainly: “Reverse Osmosis will increase the number of taps your evaporator can handle.”
RO pre-concentrates sap before it ever hits the pan. Cornell’s small-farm work on hobby-scale ROs, at 25–70 taps, reports sap going from 2% to 4–5% sugar, boil time dropping from 8 hours to 4, and wood use falling roughly 50%. A CDL Nano RO runs about $1,170–$1,290 and is rated 50–250 taps — bracketing my entire range in one box.
Now compare. Upgrading a Corsair from flat pan to raised flue pan set costs +$4,039.75. The RO is about a third of that, and the arch manufacturer itself says the RO is what raises your tap ceiling.
So the order is: RO before arch. That’s not intuitive — the arch is the romantic purchase, the one that looks like sugaring. But half the wood and half the boil for a third of the price isn’t a close call, and it’s the plan I’m building around. It also feeds straight back into the building: less water to evaporate is less steam to vent, and less wood is less shed.
Two honest caveats. Cornell’s 50% figure is from 2017 and the price is a current dealer snippet, so the framing is directional, not a quote. And Cornell’s own warning applies to me as much as anyone: “if you are not at all mechanically inclined making your own RO is probably not the best idea.” The throughput specs also conflict — CDL’s page says up to 30 GPH filtrate, a dealer snippet for the recirculation variant says 13. Probably different SKUs or different ratings, but 30 vs 13 is a 2.3× spread on a headline spec and nobody’s page says which is which. Ask before you buy.
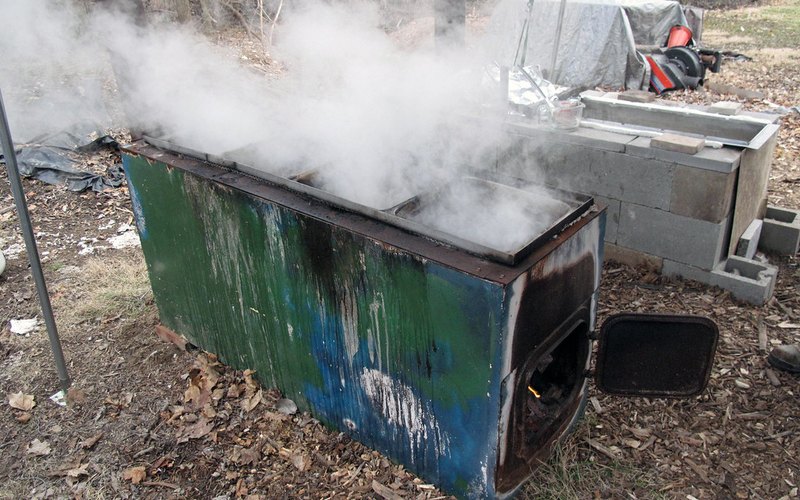
That filing cabinet, by the way, is the tier below me, and I have real affection for it. Somebody looked at office furniture and saw a firebox. Same idea as everything above — put a box around your heat so it goes into the sap instead of the sky — just executed with what was in the garage. If you’re not ready for a shack, you’re not out of the game. You’re at a different rung.
What I’m actually going to do
The plan, in order:
- Make the two calls first — township zoning administrator, county building department. Ask the retail-trade question in plain words: if I boil and pack here but sell at the store and the market, is this an exempt agricultural building? Before anything is poured. The whole argument is on the permitting page.
- Decide the retail question on paper. Sell off-site; keep the shack a production building.
- Walk the site in late winter — the wettest the ground gets, and exactly when I’ll need access. Drainage, all-weather road, power nearby.
- Buy the RO before the bigger arch.
- Size for a 2×6 even if the arch is smaller. 9–10 foot walls. Post-frame.
- Bias the cupola oversize, doors both sides, each sized to vent the whole boil alone, worked from the floor by rope.
- Makeup air high, at the eaves. CO detector. Smoke detector. Non-negotiable.
- Drains, trench, and firing pit planned before the pour — you cannot add these later.
- Design the feed-tank platform for the load. 200 gallons is 1,670 pounds; I’m not eyeballing that.
- Wood shed on the arch end, ~3 cords, because I need two seasons on site at once.
None of it is built yet. That’s the honest state of things. But I know what the building is for now — it’s a machine for getting steam out — and I know the one question that has to be answered before the concrete truck shows up. That’s further than I was when I started, and it’s why I wrote it down.
If you want the rest of it, keep going: the legal side in permitting & licensing, how sap becomes syrup, the history of the whole thing, and what to do with it once it’s in the jar.
Nothing here is legal advice, and I’m a guy with a turkey fryer, not a code official. The township zoning administrator and MDARD (1-800-292-3939) are the two calls that actually settle a sugar shack build in Michigan. Make them before you make anything else.
Comments (0)